

Embark on a culinary journey to the heart of Cornwall with these magnificent Cornish Pasties. Featuring tender, peppery chunks of beef perfectly balanced with melt-in-your-mouth vegetables, all encased in a rich, buttery, and beautifully golden pastry. The Cornish Pasty is not merely a meal; it’s a cherished symbol of English heritage, and it’s easy to see why the people of Cornwall hold such immense pride in this iconic hand-held delight. This guide will walk you through every step to create the most authentic and satisfying pasties right in your own kitchen.

The Rich History of the Cornish Pasty

The history of the Cornish Pasty stretches back for hundreds of years, making it far more than just a tasty snack. While variations of meat and vegetable encased in pastry existed for centuries, the iconic Cornish Pasty we know today truly gained prominence as a staple food for the working classes, particularly tin miners, from the 18th century onwards. These robust and wholesome parcels were the perfect meal to take down into the mines; they were nutritious, incredibly filling, and remained warm for hours, providing sustained energy for a long day of strenuous labor.
One of the most fascinating aspects of the pasty is its unique design, which was born out of practical necessity. The distinctive **crimped crust** along the side wasn’t just for decoration; it served a crucial purpose as a handle. Miners, whose hands would often be grubby and potentially covered in highly toxic substances like arsenic from the tin mines, could hold the pasty by this thick crust, eating the filling without contaminating their food. Once the nourishing interior was devoured, the crust (a sadly delicious part, in my opinion!) could then be discarded. This ingenious design perfectly illustrates the resourcefulness and resilience of the Cornish miners.
Today, the Cornish Pasty enjoys a Protected Geographical Indication (PGI) status under European Union law, meaning that only pasties made in Cornwall, following a specific traditional recipe, can bear the name “Cornish Pasty.” This ensures its authenticity, protecting its heritage and the quality of its ingredients, which must include rough-cut chunks of beef, sliced or diced potato, swede (rutabaga), and onion, seasoned with salt and pepper, all enclosed in a shortcrust pastry and baked to a golden finish.
Table of Contents
- The Rich History of the Cornish Pasty
- Essential Ingredients for Authentic Cornish Pasties
- Crafting Your Own Traditional Cornish Pasties: A Step-by-Step Guide
- Pro Tips for the Perfect Pasty
- 🍽️ Serving Suggestions for Your Cornish Pasties
- 🍲 More Beloved British Classics to Try
- 📺 Visual Guide: Watch How to Make It
- Authentic Cornish Pasties Recipe Card
Essential Ingredients for Authentic Cornish Pasties
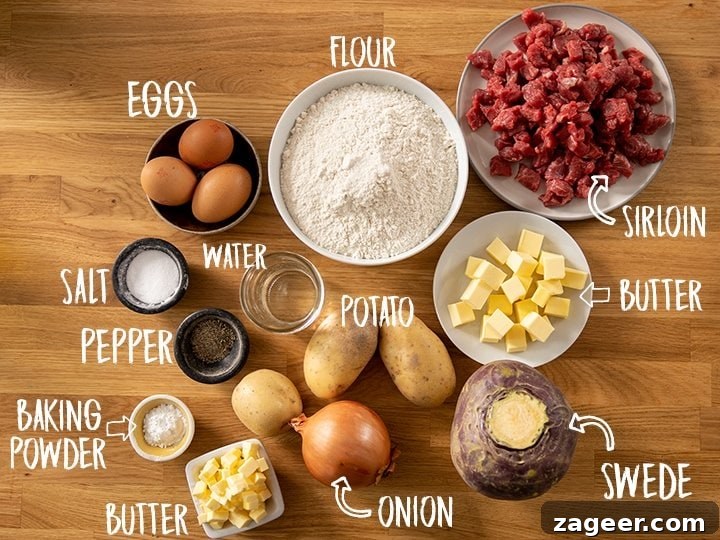
Key Ingredient Choices and Swaps for Success
Crafting the perfect Cornish Pasty begins with selecting the right ingredients. Each component plays a vital role in achieving that distinct, savory flavor and tender texture.
The Pastry: The Golden Envelope
While nothing quite beats the flaky, rich texture of homemade shortcrust pastry, we understand that time is often a luxury. You can certainly opt for good quality, **shop-bought shortcrust pastry** as a convenient alternative. If making your own, remember the golden rules: keep your butter cold, and don’t overwork the dough to ensure a tender, melt-in-your-mouth crust.
The Beef: The Heart of the Pasty
Choosing the correct cut of beef is paramount for achieving a truly tender and juicy filling. The best cuts for a traditional Cornish Pasty are **skirt steak, sirloin, or ribeye**. These cuts, when finely chopped and cooked within the pasty, yield incredibly succulent results, absorbing all the delicious vegetable juices. It is crucial to **avoid** using braising beef, chuck steak, or stewing beef. While these cuts are excellent for slow-cooked stews, they are simply too tough and chewy for the relatively shorter baking time of a pasty, leading to a disappointing texture. If using skirt steak, which can be *a little on the tougher side*, ensure you cut the meat into very small pieces and always *against the grain* to maximize tenderness.
The Vegetables: The Flavor Foundation
The classic trio of vegetables—**potato, swede (rutabaga), and onion**—forms the aromatic and hearty base of the pasty filling. The potato provides a comforting starch, the swede adds a subtle sweetness and earthy depth, and the onion offers a pungent warmth. It’s essential to dice these finely so they cook through perfectly within the pastry, becoming tender and infused with the beef juices.
Seasoning: Simple Yet Essential
A generous hand with **salt and freshly ground black pepper** is all that’s needed. Remember, the raw ingredients release their flavors and juices as they bake, creating a wonderfully seasoned filling without the need for complex spices.
Crafting Your Own Traditional Cornish Pasties: A Step-by-Step Guide
***For the full, detailed recipe with exact measurements and printable instructions, please refer to the recipe card at the very end of this post.***
Making the Perfect Pastry (Allow 1 hour for chilling)
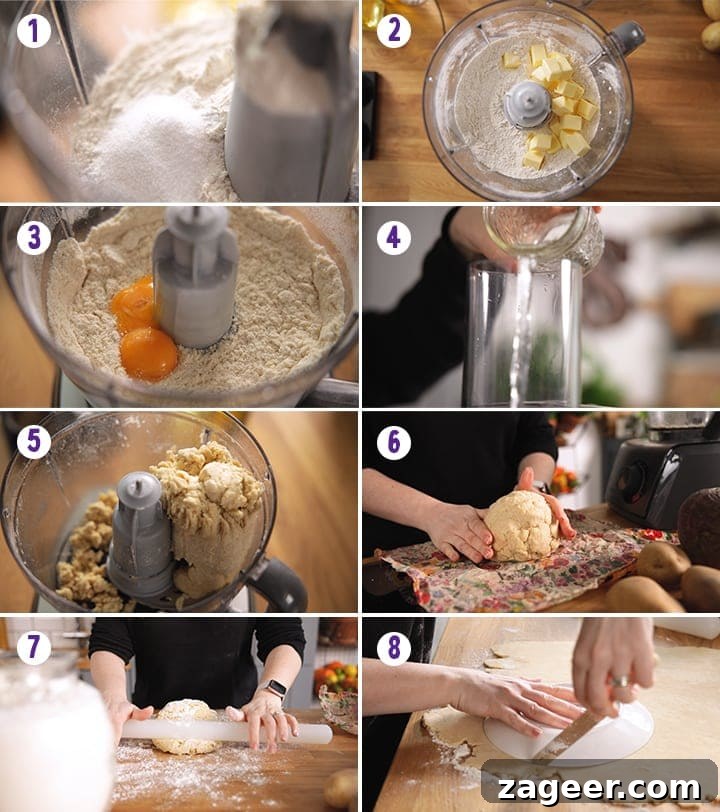
- To begin, we prepare the foundational shortcrust pastry. While you can opt for a good quality store-bought version (as noted in the recipe card), homemade offers an unparalleled flavor and texture. In a food processor, combine the **plain (all-purpose) flour**, baking powder, and salt. Pulse briefly to mix these dry ingredients evenly.
- Next, add the **cubed, cold unsalted butter** to the flour mixture. Pulse again until the butter is thoroughly incorporated, and the mixture resembles fine breadcrumbs. This ensures a wonderfully flaky pastry.
- Introduce the **egg yolks** and mix. With the motor still running, gradually add the cold water, a tablespoon at a time. Continue mixing until the dough just comes together into a cohesive ball. Be careful not to add too much water; you might not need the full amount. The dough should be firm enough to handle but not sticky.
- Remove the pastry from the food processor, gently form it into a disk, and wrap it tightly in clingfilm or **wax paper** (<– affiliate link). Refrigerate for at least one hour. This chilling period is crucial for the pastry to rest and firm up, making it easier to roll and preventing shrinkage during baking.
- Once chilled, take the pastry out and roll it on a lightly floured surface. Aim for a thickness of about 3mm (approximately 1/8 inch) – thick enough to hold the generous filling without tearing, but thin enough to be tender. Use a side plate (around 20-21cm or 8 inches in diameter) as a template to cut circles into the dough. You should get several circles from each batch, re-rolling scraps as needed.
Assembling and Baking Your Pasties
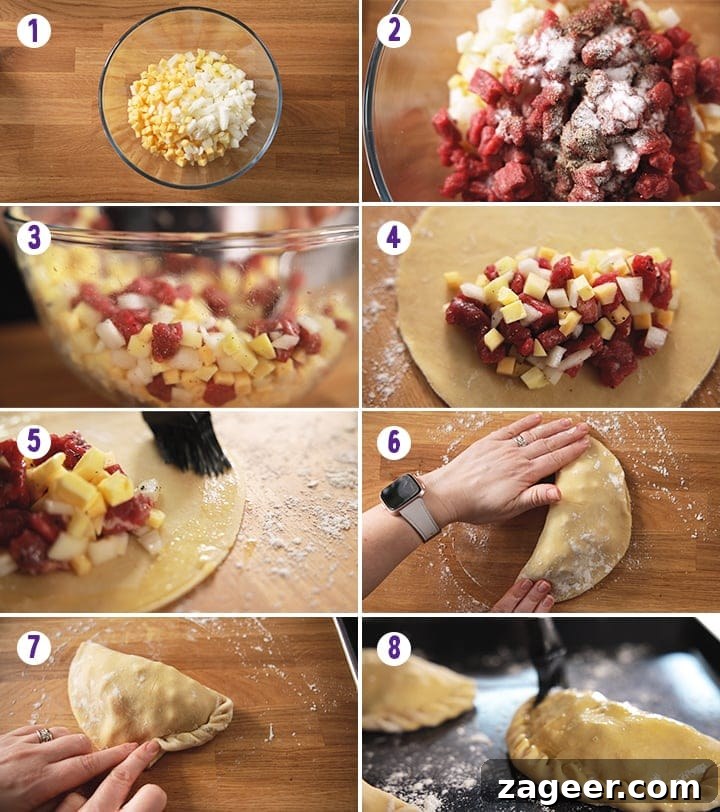
- While your pastry chills, prepare the hearty filling. In a large bowl, combine the finely cubed **potato**, **swede** (also known as rutabaga), **onion**, and the finely chopped **steak**. Season generously with **salt and black pepper**. Mix everything thoroughly to ensure the seasoning is evenly distributed amongst the raw ingredients.
- Take one of your pastry circles and place a substantial handful of the meat and vegetable mixture onto one side of the circle. Leave a clear 2cm (about 3/4 inch) border around the edge. Don’t be shy with the filling; a proper pasty should be generously packed! Dot a few small cubes of **unsalted butter** on top of the filling pile. These butter dots will melt during baking, creating richness and moisture.
- In a separate small bowl, beat one egg to create an egg wash. Brush this egg wash around the entire edge of the pastry circle. This acts as a sealant, helping the pastry edges to stick together firmly.
- Carefully fold the other side of the pastry over the meat and vegetable mixture until the edges meet, forming a neat semi-circle. Press the edges together firmly to seal the pasty, then **crimp** them artfully with your fingers. This distinctive crimp is not just traditional; it securely seals the pasty, locking in all the delicious juices. If you’re unsure about the crimping technique, watch the video guide included further down for a clear demonstration.
- Place the assembled pasty onto a prepared baking tray (lightly floured to prevent sticking). Using a sharp knife, make a small hole in the top of the pasty. This tiny vent allows steam to escape during baking, preventing the pasty from bursting. Repeat this process with the remaining pastry circles and filling. Finally, brush the tops of all the pasties with the remaining egg wash to give them a beautiful golden sheen once baked.
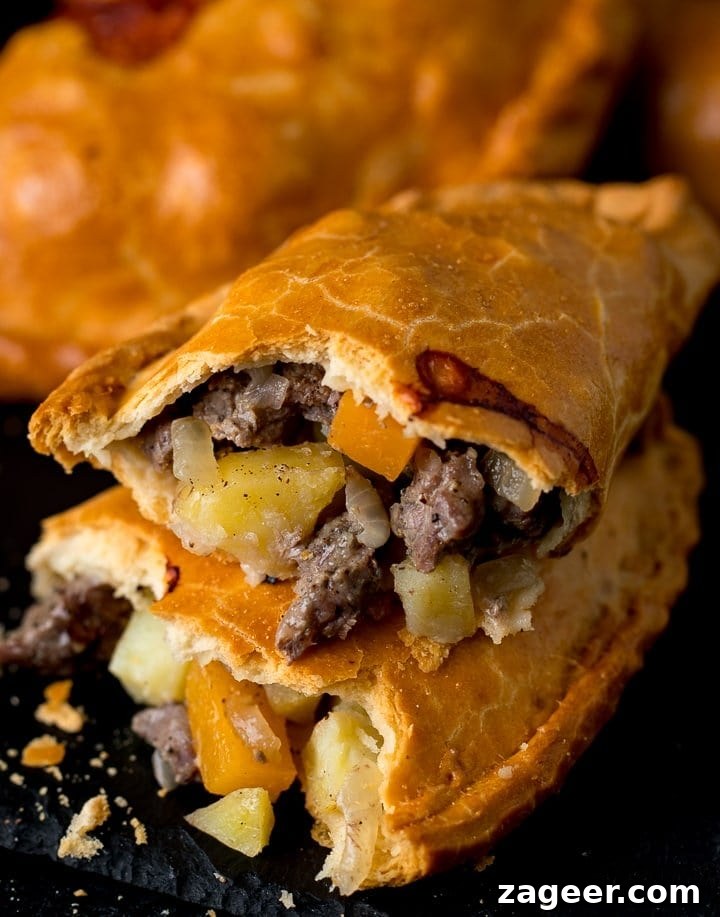
- Preheat your oven to 180°C (350°F) fan. Bake the pasties for approximately 50 minutes, or until they are beautifully **golden brown** and the pastry is crisp, and the filling is tender. The exact baking time may vary slightly depending on your oven, so keep an eye on them.
Pro Tips for the Perfect Pasty
One of the most defining characteristics of an authentic Cornish Pasty is its unique filling method. These pasties are generously filled with a mixture of **finely diced and well-seasoned steak**, onions, potatoes, and swede (or rutabaga, if you’re in the US). Crucially, all the meat and vegetables are placed into the pastry raw. A good pinch of salt and pepper, along with a few dots of butter, are added to the raw filling before it’s sealed and cooked within the pastry.
There is **no sauce** inside a traditional Cornish Pasty, and for good reason. As the pasty bakes, the raw ingredients work their magic. The juices released from the high-quality beef infuse the vegetables, creating a naturally rich and moist filling. The steam generated inside the pastry cooks the vegetables to tender perfection, resulting in a self-saucing, incredibly flavorful interior that absolutely does not need any added liquid. This method ensures maximum flavor and a beautifully tender, juicy outcome, truly setting the Cornish Pasty apart.
Using a **good quality cut of beef** is paramount here; it only requires light cooking within the pasty. The natural juices released from the meat during baking are key to flavoring the vegetables and ensuring the entire filling is **lovely and juicy**, never dry or bland. This simple yet effective cooking method is what makes a Cornish Pasty so uniquely satisfying and delicious.
Pin this recipe now to find it later!
Pin It
🍽️ Serving Suggestions for Your Cornish Pasties
While a Cornish Pasty is a complete and satisfying meal on its own, there are a few traditional and delightful ways to enjoy it even more.
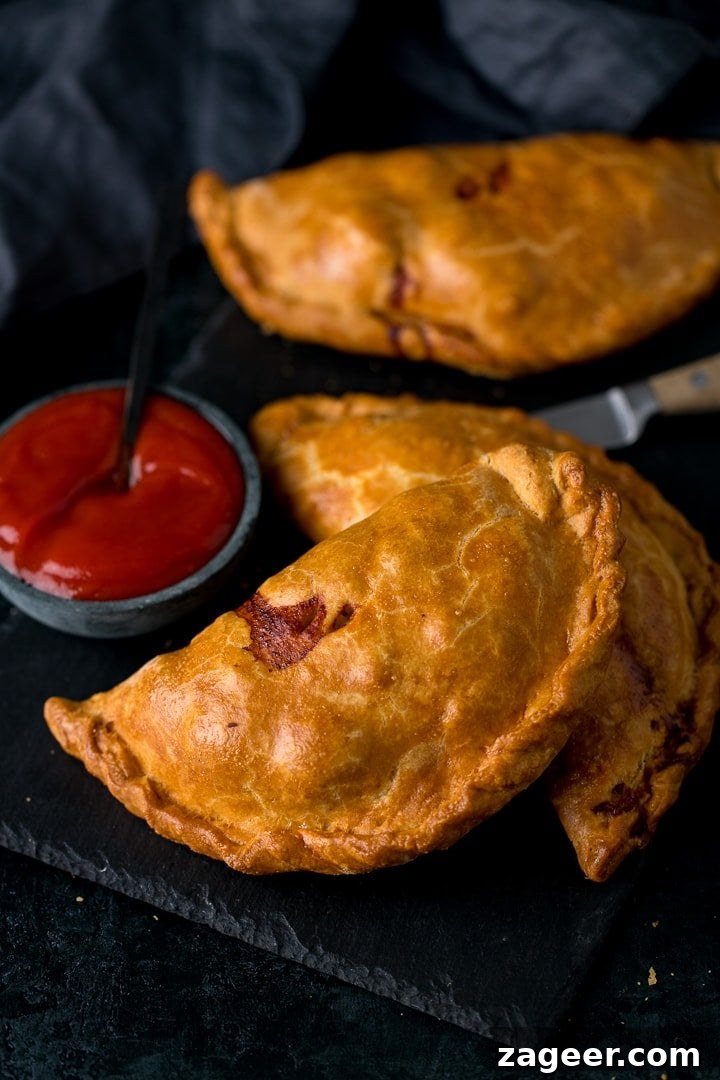
- For many, the quintessential way to savor a freshly baked Cornish Pasty is with a generous dollop of **ketchup**. The tangy sweetness of the ketchup perfectly complements the rich, savory filling.
- If you’re looking for a more substantial meal, consider serving your pasty alongside a portion of crispy **Air Fryer Chips** or traditional oven-baked fries.
- And for those who simply can’t imagine a hearty British meal without it, a rich, homemade **gravy** can also be a wonderful accompaniment for dipping or pouring over your pasty.
- Alternatively, a simple side salad with a light vinaigrette can provide a fresh contrast to the richness of the pasty, making it a well-rounded lunch or dinner.
Even though I consider myself a devout gravy superfan, there’s just something about the pairing of a warm, comforting Cornish Pasty with a good squeeze of **ketchup** that feels truly authentic and satisfying. But ultimately, how you enjoy your pasty is entirely up to your personal preference!
🍲 More Beloved British Classics to Try
If you’ve enjoyed making and tasting this traditional Cornish Pasty, you might be keen to explore more delightful recipes from the heart of British cuisine. Here are some other classic dishes that offer warmth, comfort, and timeless flavor:
British Classic Recipes
Easy Shepherd’s Pie
British Classic Recipes
Individual Chip Shop Style Cheese & Onion Pie
Dinner
Toad in the Hole with Red Onion Gravy
British Classic Recipes
Traditional Lancashire Hotpot
British Classic Recipes
Coronation Chicken
British Classic Recipes
Beer Battered Fish
📺 Visual Guide: Watch How to Make It
A video demonstration for making these traditional Cornish Pasties is available, guiding you through each step of the process for perfect results. Check the original blog post for the embedded player.
(Note: The original video player embed has been removed to comply with the “remove JavaScript” instruction. Please refer to the source website for the full video.)
Stay updated with new recipes and culinary adventures!
Subscribe to our newsletter to receive notifications when new recipes are published. You can also find us on YouTubefor weekly video tutorials and on Instagramfor behind-the-scenes stories and inspiring food photography.

Pin
Click the stars to rate or comment!
Authentic Cornish Pasties
1 hour 30 minutes
50 minutes
2 hours 20 minutes
Ingredients
For the Pastry:
- 450 g (3 2/3 cups) plain (all-purpose) flour plus a couple of tbsp extra for rolling out the pastry and sprinkling on the tray later
- 2 tsp baking powder
- 1 tsp salt
- 125 g (1/2 cup + 1 tsp) unsalted butter chopped into chunks and kept cold
- 2 egg yolks
- 125 ml (1/2 cup + 1 tsp) cold water use as needed
For the Filling:
- 450 g (1 lb) potato peeled and finely diced
- 150 g (1/3 lb) swede/rutabaga peeled and finely diced
- 150 g (1/3 lb) onion peeled and finely chopped
- 300 g (2/3 lb) skirt steak or sirloin steak finely chopped, with fat discarded (weigh the meat after discarding the fat)
- 1 tsp salt
- 1 tsp ground black pepper
- 3 tbsp unsalted butter chopped into small cubes
- 1 egg beaten, for egg wash
Instructions
-
First, prepare your pastry. Place the flour, baking powder, and salt into a food processor and pulse briefly to combine.450 g (3 2/3 cups) plain (all-purpose) flour, 2 tsp baking powder, 1 tsp salt
-
Add in the cold, cubed butter and whizz until the mixture takes on the consistency of fine breadcrumbs.125 g (1/2 cup + 1 tsp) unsalted butter
-
Incorporate the egg yolks and mix. Then, with the food processor motor running, add the cold water gradually, a little at a time, until the dough comes together into a ball. Be mindful that you might not need all the water; stop once the dough is formed.2 egg yolks, 125 ml (1/2 cup + 1 tsp) cold water
-
Remove the pastry from the food processor, shape it into a disc, and wrap it tightly in clingfilm or wax paper (<–affiliate link). Refrigerate the dough for at least an hour to allow it to rest and firm up.
-
Preheat your oven to 180°C (350°F) fan. Prepare two large baking trays by sprinkling them lightly with flour to prevent sticking.
-
Retrieve your chilled pastry from the fridge. Roll it out on a lightly floured surface until it reaches a consistent thickness of approximately 3mm (about 1/8 inch). This thickness is ideal for cutting without tearing and for supporting the hearty filling.
-
Using a plate about 20-21cm (approx 8 inches) in diameter as a guide, cut circles from the rolled-out dough. Typically, you can get 3 circles from the initial roll. Re-roll the dough scraps to yield another 2 circles, and then a final re-roll should provide one last circle, for a total of 6 pasties. You can stack these circles on a plate, ensuring you dust a little flour between each layer to prevent them from sticking.
-
In a large mixing bowl, combine the finely diced potato, swede/rutabaga, onion, and steak. Season generously with salt and black pepper, mixing well to distribute the seasoning evenly.450 g (1 lb) potato, 150 g (1/3 lb) swede/rutabaga, 150 g (1/3 lb) onion, 300 g (2/3 lb) skirt steak or sirloin steak, 1 tsp salt, 1 tsp ground black pepper
-
Place one pastry circle onto your work surface. Scoop a generous handful of the meat and vegetable mixture onto one half of the circle, ensuring you leave a clear 2cm (3/4 inch) border around the curved edge. It might seem like a lot of filling, but it’s meant to be packed full!
-
Dot about 1.5 teaspoons of the cubed unsalted butter (from the 3 tbsp total) on top of the meat and vegetable pile.3 tbsp unsalted butter
-
Using a pastry brush, paint a little of the beaten egg wash around the entire 2cm border of the pastry circle. This will help the pastry edges adhere firmly when sealed.1 egg
-
Carefully fold the other side of the pastry over the filling, aligning the edges to create a semi-circle. Press down firmly to seal the edges, then create the traditional Cornish crimp with your fingers. This distinctive crimp is vital for a secure seal and aesthetic appeal (refer to the video above if you need a visual guide).
-
Transfer your crimped pasty onto one of your prepared baking trays. Using a sharp knife, make a small incision (a tiny hole) on the top of the pasty to allow steam to escape during baking. Repeat this assembly process for all remaining pasties.
-
Brush the remaining egg wash generously over the tops and sides of all the pasties. This will ensure they bake to a beautiful, golden-brown finish. Place the trays in the preheated oven and bake for approximately 50 minutes.
-
Once baked to a perfect golden hue, remove the pasties from the oven. Allow them to cool on the baking tray for about 5 minutes before serving. They will be piping hot inside!
Video
For a detailed visual walkthrough of making Cornish Pasties, a video guide is available. It covers everything from pastry preparation to the famous crimping technique. Please check the original blog post for access to the video content.
Chef’s Notes & FAQs
Can I make Cornish Pasties ahead of time?
Absolutely! Prepare and bake the pasties according to the recipe. Once fully cooked, allow them to cool completely. Cover them tightly and refrigerate for up to 2-3 days. When ready to serve, reheat them in a preheated oven at 190°C (375°F) for about 20-30 minutes, or until thoroughly heated through and the pastry is crisp again.
Can I freeze Cornish Pasties?
Yes, Cornish Pasties freeze exceptionally well. Bake the pasties as instructed, then let them cool completely. Wrap each pasty individually in clingfilm and then in foil, or place them in an airtight freezer-safe container. They can be frozen for up to 3 months. To reheat, thaw them in the refrigerator overnight. Then, place them on a baking tray and reheat in a preheated oven at 190°C (375°F) for 30-40 minutes, ensuring they are piping hot throughout.
Is store-bought pastry an option?
Certainly! While homemade pastry adds a special touch, using a good quality, ready-rolled shortcrust pastry from the supermarket is a perfectly acceptable time-saving alternative. Just ensure it’s a shortcrust variety for that authentic pasty texture.
What is the best cut of beef for Cornish Pasties?
For the most tender and juicy filling, **skirt steak, sirloin, or ribeye** are the preferred cuts for Cornish Pasties. These cuts cook beautifully within the pastry, becoming succulent and flavorful.
*Note:* Skirt steak can be a bit tougher if not handled correctly. Always ensure it’s cut into **small pieces** and *against the grain* to achieve optimum tenderness.
It is vital to **avoid** braising beef, chuck, or stewing beef. These cuts require much longer, slower cooking methods to tenderize and will remain chewy and tough when baked inside a pasty.
Recipe Source:
Adapted from a Hairy Bikers recipe.
Nutritional Information is an estimate per pasty.
Nutrition Facts
Carbohydrates: 72g |
Protein: 22g |
Fat: 32g |
Saturated Fat: 18g |
Cholesterol: 182mg |
Sodium: 1026mg |
Fiber: 4g |
Sugar: 2g
Nutrition information is automatically calculated and should only be used as an approximation. Factors such as exact ingredient brands and preparation methods can cause variations.
Did you love this recipe? Leave a comment and rating below!Your feedback helps us and other home cooks.
This post was first published in August 2014, and has been thoroughly updated and improved with additional details, photos, and housekeeping reasons to enhance your cooking experience.
Some of the links in this post may be affiliate links – which means if you buy the product I get a small commission (at no extra cost to you). If you do buy, then thank you! That’s what helps us to keep Kitchen Sanctuary running. The nutritional information provided is approximate and can vary depending on several factors. For more information please see our Terms & Conditions.