
Say goodbye to soggy, burnt, or undercooked rice. This is the **easiest and most reliable** way to achieve perfectly fluffy rice in a saucepan, every single time.
As someone who cooks rice multiple times a week, I’ve perfected a straightforward method that consistently delivers ideal results. This technique has been tested hundreds, if not thousands, of times in my own kitchen and is the only way I prepare long-grain rice.
Are you unsure whether to rinse your rice, stir it during cooking, or drain excess water afterward? I’m here to answer all your burning questions and demystify the art of cooking rice on the stove.
How to Cook Rice Perfectly on the Stove: A Foolproof Method
For as long as I can remember, the aroma of freshly cooked rice has been a staple in my home. My mum taught me this simple, yet incredibly effective method when I was just a child, and it’s a technique I’ve carried with me through decades of cooking. In fact, she still uses the same trusty saucepan for her rice that she did when I was growing up!
It wasn’t until I moved away for university, sharing communal kitchens with fellow students, that I realized just how challenging cooking rice could be for many. I witnessed culinary disasters ranging from disappointingly soggy and sticky rice to frustratingly hard or even burnt grains stuck to the bottom of pans. The most common mistake I observed was treating rice like pasta—boiling it in vast quantities of water only to drain it, often resulting in a starchy, glutinous mess. It seemed a fundamental skill, how to cook rice on the stove, was lost on many.
That experience inspired me to share this tried-and-true method, passed down through generations. It’s the ultimate guide to achieving fluffy, separate long-grain rice without any unnecessary fuss or complicated steps. Whether you’re a novice cook or someone who has struggled with rice for years, this approach will transform your rice-making experience. I’ve even adapted it slightly for different heat sources, so you’ll find tips for both gas burners and induction hobs.
Before we dive into the step-by-step instructions, let’s cover the most important foundational tips. Mastering these will be your secret to consistently cooking perfect rice.
Essential Tips for Perfect Rice
This particular method is optimized for regular **long-grain white rice**. It’s crucial to avoid “easy-cook” or “parboiled” varieties, as their pre-processed nature means they don’t absorb water or flavors in the same way. While easy-cook rice might seem convenient, its slightly shiny, non-stick exterior prevents it from fully soaking up accompanying sauces, impacting the overall taste and texture, especially if you plan to use it for dishes like fried rice. I only use easy-cook rice for specific recipes, such as stuffed peppers, where a quicker cook time and slightly different grain texture are desired. For everything else, standard long-grain white rice is superior.
Contrary to popular belief, **rinsing is not necessary** for this method when using decent quality long-grain white rice. Many people rinse rice to remove excess starch, aiming for less sticky grains. However, with good quality rice (even store-brand varieties often suffice), stickiness shouldn’t be a major issue. Your rice might be slightly clumpy, but it won’t be a gluey mess, and these clumps can easily be separated with a fork after cooking. Personally, I prefer my rice to have a slight natural clump, as it makes it easier to eat with many dishes.
Choosing the right pan size is more important than you might think. **Avoid using a pan that is too large.** Since you’ll be cooking the rice over a low heat, a smaller saucepan facilitates better, more even heat distribution. For a typical batch of approximately 4-6 portions of rice, a saucepan with a capacity of 1.8 – 2.2 liters (about 1.5 – 2 quarts) is ideal. This ensures the rice cooks consistently without burning at the bottom or remaining undercooked at the top.
Always **start with boiling water** before adding your rice. This kick-starts the cooking process immediately and helps maintain an even temperature throughout. The initial amount of water in the pan will guide how much rice you should add to achieve the perfect ratio.
While this method encourages an “by-eye” approach (which we’ll explain in the steps), if you prefer precise measurements, the general rule of thumb for long-grain white rice is **one part rice to one-and-a-half parts water**. For example, if you use 1 cup of rice, you’ll need 1.5 cups of water. This ratio ensures that all the water is absorbed, leaving you with perfectly cooked, fluffy grains without the need for draining.
How to Cook Perfect Long-Grain Rice: Step-by-Step
Follow these simple steps to cook flawless rice every time, without any rinsing, soaking, or draining.
#1 Prepare the Water
Start by filling your saucepan approximately 1/3 full with water. For six generous portions of rice, this usually works out perfectly. Bring this water to a rolling boil over high heat. You can add a pinch of salt to the water at this stage if desired, but it’s not strictly necessary for the cooking process itself.
#2 Add the Long-Grain Rice
Once the water is vigorously boiling, it’s time to add the rice. This is where the “by-eye” method comes in handy. Slowly pour the long-grain rice directly into the center of the boiling water. Continue pouring until a small amount of rice (about a tablespoon’s worth) is visible just above the water level, as demonstrated in the image above. This visual cue helps you achieve the ideal rice-to-water ratio without needing to measure precisely.
#3 Stir Briefly and Cover
After adding the rice, give it one quick, gentle stir. This ensures all the grains are submerged and evenly distributed. Immediately after stirring, place a tight-fitting lid securely on the pan. The lid is crucial for trapping steam, which is essential for cooking the rice thoroughly.
#4 Adjust the Temperature
The moment the lid is on, reduce the heat significantly. Do not wait for the water to return to a full boil after adding the rice; adjust the temperature immediately. For gas hobs, turn the burner down to the absolute lowest setting your stove can manage. For electric or induction hobs, you might need a slightly higher, but still very low, setting. On my induction hob, I use level 5 (out of 9), as the lowest settings are often too weak. You might need to experiment slightly with your specific electric or induction stove. A good rule of thumb is to go about three settings lower than what it takes to maintain a gentle, rolling boil in a pan of plain water.
#5 The Golden Rule: Leave It Alone!
Now, the most critical step: **cook the rice undisturbed for 20 minutes.** This duration allows the rice to absorb all the water and cook evenly through steam, preventing it from burning at the bottom. **Do not stir the rice, and crucially, do not open the lid during this time.** Every time you lift the lid, precious steam escapes, dropping the temperature and interrupting the cooking process, which can lead to unevenly cooked rice. If you feel an overwhelming urge to check, you can peek quickly after 15 minutes, but resist the temptation if possible. The rice will cook perfectly on its own at a low heat.
After 20 minutes, turn off the heat. If, by chance, the rice is still a bit hard and there’s absolutely no water left in the pan, simply add a small splash (a few tablespoons) of boiling water, replace the lid, and let it sit for another 5 minutes off the heat. Don’t worry about overcooking; as long as the heat is low and there isn’t excessive water, rice can tolerate a fair amount of extra time. I’ve accidentally left mine for 30+ minutes before, and it was still fine!
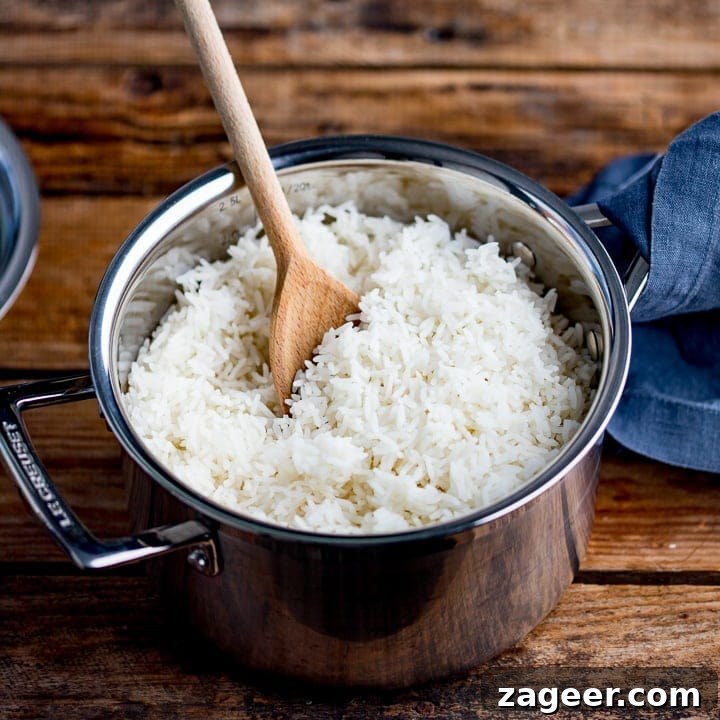
Your perfectly cooked rice should look exactly like this when it’s done – with **no water left to drain off**. If you’re serving it immediately (and not converting it into something like fried rice, which benefits from slightly older rice), give it a good fluff with a fork to separate the grains and release any remaining steam. This makes the rice even lighter and more appealing.
And there you have it! Once you understand these fundamental tips and follow the method, cooking rice will transform from a daunting task into an effortless culinary skill. You’ll never go back to guesswork again!
Looking to elevate your rice game even further? Consider transforming your freshly cooked rice into a delicious fried rice dish. Explore my Fried Rice Masterclass for detailed techniques, or level up your meal with my popular recipe for Chicken Fried Rice.
What to Serve with Your Perfectly Cooked Rice
Perfectly cooked rice is the ultimate versatile side dish, pairing beautifully with an incredibly diverse range of cuisines and flavors. From rich curries to savory stir-fries, fluffy rice provides the ideal canvas. Here are just a few of my absolute favorite recipes that shine when served alongside your expertly prepared rice:
- Crispy Sesame Chicken (an absolute reader favorite, with a delightful sticky Asian sauce!)
- Classic Chicken Tikka Masala (a creamy, aromatic Indian curry)
- Crispy Chilli Beef with Broccoli – Chris’s favorite (a takeout classic, made better at home)
- Slow Cooker Butter Chicken – great for family gatherings (tender chicken in a rich, buttery sauce)
- Beef Massaman Curry – melt-in-your-mouth beef in a mildly spiced, rich curry sauce 😋
- Crispy Korean Fried Chicken – Gracey’s favorite (irresistibly crunchy and flavorful, reflecting her current obsession with Korean culture!)
- Pork Katsu Curry– a fantastic alternative to conventional curry recipes (crispy pork cutlets with a mild, fruity curry sauce)
- Chris’s AMAZING Chilli Con Carne – This hearty, flavorful chili is always on our weekly rotation.
- Sticky Chinese Pork Belly – one of our ultimate treat meals (succulent, tender pork belly in a sweet and savory glaze). If you’ve never tried it, please do!
- Slow Cooker Spicy Chicken Curry – Everyone immediately starts drooling when they walk through the door and smell this curry slowly cooking away.
- 20-Minute Peanut Butter Chicken – the quickest curry, mild enough for kids and grandparents to enjoy!
Please note: These detailed instructions are specifically for **long-grain white rice only**. Other varieties of rice, such as basmati, jasmine, sushi rice, or brown rice, require different water quantities and cooking times due to their unique starch content and grain structure. If you’d like me to create dedicated posts on how to perfectly cook these other **different types of rice**, please let me know in the comments below, and I’ll be happy to share my methods with you all. Happy cooking!
Stay updated with new recipes and culinary tips!
Subscribe to our newsletter to receive notifications when I post a new recipe. You can also find me on YouTubefor new videos every week and on Instagramfor behind-the-scenes stories and beautiful food photography.
Pin Recipe
Print Recipe
Click the stars to rate or comment
How to Cook Rice Perfectly
Nicky Corbishley
20 mins
20 mins
6 people
Sides
All
Ingredients
- 900 ml (3 3/4 cups) water
- 540 g (2 1/2 cups) long grain rice (not easy cook rice)
Instructions
-
Bring the water to a boil in your saucepan. Once boiling, pour in the long-grain rice (no need to rinse). Give it one quick stir to ensure the rice is covered by the water. Immediately place a tight-fitting lid on the pan. For gas hobs, reduce the heat to the very lowest setting. For electric or induction, use a low-medium temperature (e.g., induction level 5 of 9).900 ml (3 3/4 cups) water,
540 g (2 1/2 cups) long grain rice -
Cook undisturbed for 20 minutes. After 20 minutes, turn off the heat and remove the lid. Fluff the rice gently with a fork to separate the grains. Note: The rice will remain perfectly hot for a good 30 minutes if you leave the lid on the pan after turning off the heat, with no negative impact on its texture or flavor.
Notes
Nutrition
|
Carbohydrates: 62g
|
Protein: 5g
|
Fat: 1g
|
Saturated Fat: 1g
|
Sodium: 12mg
|
Fiber: 1g
|
Sugar: 1g
Nutrition information is automatically calculated, so should only be used as an approximation.
This post was originally published in September 2019. It was updated in June 2020 with additional information and for housekeeping reasons, ensuring the most accurate and helpful content for our readers.
More Amazing Rice Dishes to Inspire Your Next Meal
Asian
Nasi Goreng – Indonesian Fried Rice
Asian
Chicken Fried Rice
Sides
Pilau Rice Recipe
Asian
Special Fried Rice Masterclass
Dinner
Creamy Tomato Risotto with Crispy Garlic Crumbs
Salads
Salmon Sushi Bowl
Breakfast & Brunch
Brown Rice Porridge with Figs and Blueberries
Asian
Cauliflower Fried Rice
Some of the links in this post may be affiliate links – which means if you buy the product I get a small commission (at no extra cost to you). If you do buy, then thank you! That’s what helps us to keep Kitchen Sanctuary running. The nutritional information provided is approximate and can vary depending on several factors. For more information please see our Terms & Conditions.