
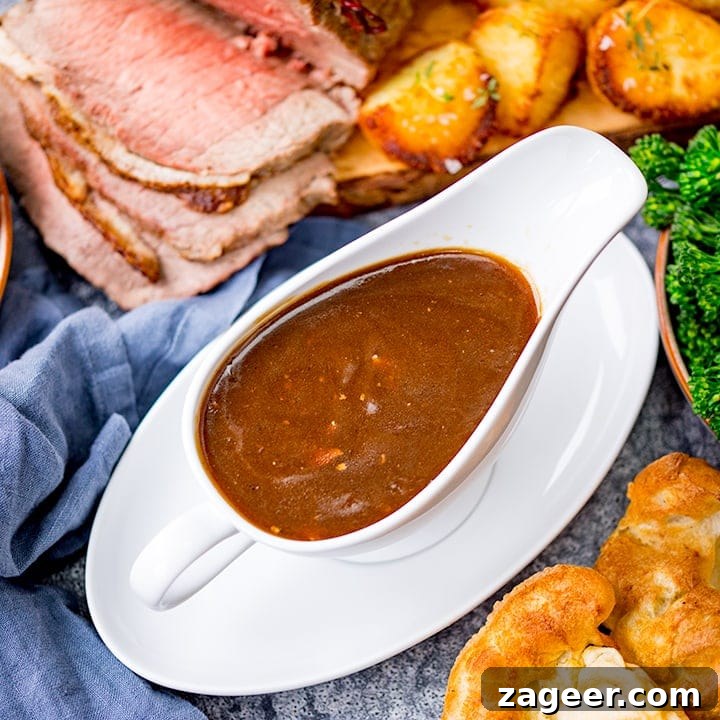
Embark on a culinary journey to master the art of making exceptional gravy. This detailed guide is an integral part of our comprehensive, step-by-step approach, complete with a FREE time-plan, designed to help you craft the perfect roast dinner.
The Ultimate Guide to Making Rich, Flavorful Gravy for Your Roast Dinner
While I appreciate the elegance of ‘au jus’ – a delicate drizzle of savory, meaty sauce gracing just the slices of roasted meat, allowing potatoes and vegetables to maintain their vibrant, bare presentation – my culinary heart yearns for something more substantial.
I don’t simply desire a modest trickle of au jus. What I crave, and what my family expects, is an abundance of luscious gravy. And by abundance, I mean floods of it!
Imagine your plate generously swathed in rich, dark gravy, enveloping every forkful of roast beef, crispy roast potatoes, and tender vegetables. Picture an extra pool of it reserved specifically for dipping, and a Yorkshire pudding so thoroughly filled it bursts open like a glorious gravy river, cascading from its golden, crispy dam. This is the gravy experience we seek, and this guide will show you how to achieve it – ensuring every drop is packed with unparalleled flavor.
This comprehensive guide will walk you through the process of creating a large batch of deeply flavorful gravy, leveraging the precious meat juices rendered from your perfectly roasted joint.
Choosing the Right Meat for the Best Gravy Base
The foundation of an outstanding gravy begins with your choice of roasted meat. Each type offers unique flavors and benefits that contribute to the final sauce.
Chicken: A Versatile Foundation
A good quality chicken provides a wonderful base for a light yet flavorful gravy. When selecting your chicken, opt for a larger bird, preferably free-range and organic. These chickens typically enjoy a better diet and more movement, resulting in more tender meat and, crucially, more flavorful pan juices. Before roasting, ensure you brush the chicken generously with olive oil and season liberally with salt and freshly cracked black pepper. The caramelization of these seasonings on the skin contributes significantly to the savory drippings.
Lamb: Rich & Robust
For many, a succulent roast lamb leg or shoulder is the epitome of a roast dinner, and it’s certainly a top contender for gravy excellence. Lamb is naturally a fattier meat, boasting a rich, distinctive flavor that translates beautifully into a deeply satisfying gravy. A personal favorite addition to lamb gravy is a teaspoon of fresh mint sauce, which beautifully complements the lamb’s inherent richness. As with chicken, a generous coating of olive oil, salt, and pepper before roasting will enhance the development of those crucial pan juices.
Pork: The Art of Enhancing Flavor
While roast pork with its irresistible crackling is a beloved dish, extracting profound flavor from its meat juices for gravy can be the most challenging. The protective layer of fat and skin ensures a juicy joint, but the drippings themselves often lack the inherent depth found in beef or lamb. To overcome this, I consistently fortify pork meat juices with a blend of both beef and chicken stock (from crumbled cubes or liquid stock). This combination provides a nicely balanced flavor profile that elevates the pork gravy from simple to sublime. For a perfect pork crackling joint, remember to score the skin meticulously and rub it with plenty of salt before it goes into the oven, ensuring maximum crispness and flavor.
Beef: The King of Gravy Flavors
In my experience, a premium joint of beef consistently delivers the most flavorful gravy. Look for cuts with a good layer of fat on top and delicate veins of fat (not gristle) running through the muscle, as this marbling is key to rich drippings. When I’m indulging, a ribeye joint is my preference. For a more economical yet still delicious option, a high-quality beef topside or top rump joint works wonderfully, though these cuts are typically leaner than ribeye. Roasting beef in the oven with a splash of olive oil and a generous sprinkle of salt and pepper will yield intensely tasty meat juices that form the heart of your gravy.
I’ve also used brisket in the past, but being a tougher cut, it demands longer, slower cooking. As it doesn’t produce as many drippings, I often add half a bottle of red wine to the roasting pan and cover the brisket during its low and slow cooking. This ensures a beautifully flavorful liquid base for the gravy.
The Great Gravy Debate: To Trivet or Not to Trivet?
Some chefs advocate for roasting meat on a “trivet” of coarsely chopped onions and carrots. This method can help keep the underside of the meat moist and, theoretically, the caramelized vegetables add flavor to the gravy once they are mashed and the liquid extracted at the end of cooking. These vegetables are then typically discarded.
However, I seldom employ a vegetable trivet. My preference is for the meat juices to drip directly onto the hot roasting pan, where they begin to caramelize and build up a concentrated layer of flavor – known as ‘fond’. These lovely darkened, caramelized juices, in my opinion, impart the deepest, most authentic flavor to the gravy. The idea of vegetables absorbing these precious drippings, only for them to be squeezed out and then discarded, feels like throwing away valuable flavor.
The instances where a vegetable trivet proves beneficial are for meats that require very long cooking times, such as a large brisket or a substantial turkey. For brisket, which needs all the moisture it can get, I also add wine to the base of the pan. This way, as the meat juices are released into the vegetables, they also combine with the wine, creating a richer liquid. For a large turkey, which yields an abundance of meat juices, a trivet can still allow for plenty of drippings to be collected, ensuring no flavor is wasted.
Elevating Flavor: The Indispensable Role of Stock
Wanting plenty of rich gravy? Then you’ll absolutely need the assistance of good quality stock. While the meat juices from your roasting joint provide a wonderfully deep and complex flavor, they are often insufficient in volume to create a generous quantity of gravy for a family-sized roast. Supplementing these concentrated meat drippings with hot vegetable water from boiling or steaming your accompanying vegetables and a few crumbled stock cubes (or concentrated liquid stock) will significantly extend your gravy, ensuring it remains full of flavor with the meat essences still shining through.
My go-to choices are chicken or beef stock cubes, usually one per cup (approximately 240ml) of water. Even better, if I have a batch of homemade stock stashed in the freezer, that’s my preferred option for an unparalleled depth of flavor. For a gluten-free gravy, I highly recommend Essential Cuisine concentrated liquid stock or powder. Although it’s a more premium option than standard stock cubes, its flavor is truly outstanding. (Please note, while I’ve collaborated with them previously, this mention is entirely unsolicited). This brand is primarily available in the UK, either online or in larger farm shops. If you’re based in the US and have discovered a fantastic gluten-free stock cube, powder, or liquid, please share your recommendations in the comments below, and I’ll be sure to include it in this post to help others!
Achieving Perfect Consistency: Cornflour vs. Roux
Prepare for a slight surprise, but when it comes to thickening gravy, I lean towards the cornflour (cornstarch) method over the traditional roux. The roux method, which involves sprinkling flour into the meat juices, stirring it to form a paste, and then gradually adding liquid, is indeed more conventional. However, it carries a higher risk of common pitfalls: a “floury” taste if the flour isn’t sufficiently cooked out, or a lumpy gravy if the stock isn’t incorporated with extreme care and constant whisking. Some culinary enthusiasts believe the roux method yields a more profound flavor, but from my experience, the difference in taste is negligible.
The cornflour method simplifies the process significantly. You can add all the liquid first, allowing you to easily gauge and achieve your desired quantity of gravy. Once the liquid is heated, you simply whisk in a cornstarch slurry (a mixture of cornflour and cold water) to thicken it to perfection. This method consistently produces a beautifully glossy, shiny gravy, and it inherently results in a gluten-free gravy, provided you use a gluten-free stock. For those who prefer the traditional approach, fear not – I’ll include detailed instructions for both methods within the recipe card below.
Maximizing Flavor: Making Gravy from Roasted Bones (Brilliant for Make-Ahead Gravy)
Is it peculiar that my freezer contains a dedicated bag of roasted bones? Perhaps, but it’s a secret weapon for incredible gravy! Whenever we enjoy a roast – be it chicken, lamb, or beef – anything roasted on the bone, I meticulously save the bones. They go straight into a freezer bag, collecting over time. Once I have a couple of chicken carcasses or a good assortment of bones, I combine them all into a large stock pot – a mix of lamb, beef, and chicken bones works wonderfully together. To this, I add a couple of roughly chopped onions (no need to peel), a few broken carrots (again, no peeling required), a stick of celery, and half a teaspoon each of salt and pepper. Cover these ingredients with water until it nearly reaches the top of the pan, then bring it to a boil. Reduce the heat and simmer gently for 3-4 hours, allowing the liquid to reduce by approximately three-quarters, intensifying its flavor.
Once cooled slightly, strain the rich liquid into a bowl, ensuring you press down firmly on the bones and vegetables with a spoon to extract every last drop of flavorful liquid. This homemade stock can be cooled and frozen for future use or utilized immediately. It forms an exceptional base for soups, or you can heat it and whisk in a cornstarch slurry (2 tablespoons of cornflour/cornstarch mixed with 5 tablespoons of cold water) until it thickens into a luxurious gravy. For a darker hue, add a splash of gravy browning. To further amplify the flavor, consider stirring in a crumbled stock cube of your choice.
Crafting Gravy Without Meat Juices: Solutions for Any Meal
What if you want to enjoy a hearty toad in the hole or classic chips and gravy, but don’t have any roasted meat drippings on hand? Fret not, there are delicious alternatives to resorting to just water and powdered gravy (no offense to quick mixes!).
You have several fantastic options to create a flavorful gravy from scratch:
- **Utilize Your Homemade Bone Stock:** The delicious stock you meticulously made and froze earlier from boiling roasted bones (as detailed above) is your prime candidate. Simply thaw, heat, and thicken for a robust gravy base.
- **Craft an Onion-Based Caramelized Gravy:** This method creates a deeply savory gravy without any meat. Start by frying one finely sliced onion, along with 1 teaspoon of light brown sugar and 2 tablespoons of unsalted butter, over a low heat for 15-20 minutes. Patience is key here, as you want the onions to slowly caramelize to a rich, golden brown. Once caramelized, sprinkle over 2 tablespoons of plain flour and stir well. Cook for another 2 minutes, ensuring the raw flour taste is cooked out. Gradually pour in 2 cups (approximately 420ml) of hot beef stock (made from water and two stock cubes), stirring continuously with a whisk. Continue stirring until the gravy thickens to your desired consistency. While this uses the roux method, it’s less prone to lumps as the flour initially adheres to the onions. Finish with a splash of Worcestershire sauce for extra depth and season with salt and pepper to taste before serving.
- **Quick Stock-Cube Blend Gravy:** For a rapid and flavorful option, combine water in a pan with a mixture of stock cubes – chicken and beef work brilliantly for a balanced flavor, and a lamb cube can be added if available. Aim for one stock cube per cup (240ml) of water, or use concentrated liquid stocks (again, a blend of Essential Cuisine liquid stocks/glaces offers superior flavor). Bring the mixture to a boil, then whisk in a cornstarch slurry (2 parts cornflour/cornstarch mixed with 5 parts cold water) until the gravy thickens. Season generously with salt and pepper to taste.
Step-by-Step Guide to Your Ultimate Homemade Gravy
Here’s how to bring your flavorful gravy to life, right in your roasting tin (remember, ensure your tin is suitable for direct heat!).
Heat the accumulated meat juices directly in your roasting tin on the stovetop:
Sprinkle in two or three crumbled stock cubes, or add a couple of teaspoons of concentrated liquid stock to the simmering juices:
While stirring constantly, pour in the hot vegetable water collected from boiling or steaming your vegetables and potatoes. Bring the entire mixture to a boil and lightly season with salt and pepper to taste.
Prepare a simple cornstarch slurry by mixing 2 parts cornflour/cornstarch with 5 parts cold water until smooth. Whisk this slurry into the boiling gravy until it visibly thickens to your desired consistency.
Allow the gravy to gently bubble for a minute or two. Incorporate any additional meat juices that may have collected from the rested meat. Taste and adjust seasoning, adding more salt and pepper if necessary.
Serve your magnificent gravy immediately. Alternatively, turn off the heat and keep it warm until the rest of your roast dinner is ready, then reheat gently just before serving. If hob space is at a premium, transfer the gravy into a microwave-safe jug and reheat it quickly in the microwave right before mealtime.
For the Perfect Roast Dinner
This gravy recipe is an essential component of my comprehensive ‘How to Make a Roast Beef Dinner Step-by-Step Time Plan’ post. Be sure to check it out for easy-to-follow instructions on crafting a truly mouthwatering roast beef dinner from start to finish!
Classic Homemade Gravy Recipe
Nicky Corbishley
5
10
15
6
Sides
British
Ingredients
- Meat juices from your roasted meat
- 2-3 crumbled stock cubes (chicken, beef or lamb, depending on which meat you’ve cooked, or a mixture of chicken and beef for roast pork gravy; alternatively, 3 tsp concentrated liquid stock)
- 720 ml (3 cups) hot vegetable stock (from your boiled/steamed vegetables and potatoes)
- ¼ tsp salt
- ¼ tsp black pepper
- 2 tbsp cornflour/cornstarch
- 5 tbsp cold water
- ¼ tsp gravy browning (optional)
Instructions (Cornflour Method)
-
Heat the meat juices in the roasting tin (ensure your roasting tin can take direct heat).
-
Sprinkle in the crumbled stock cubes (or add the liquid stock).
-
Stir together whilst pouring in the hot vegetable water. Bring to the boil and lightly season with salt and pepper.
-
In a small bowl, whisk together the cornflour/cornstarch and cold water to create a smooth slurry. Stir this slurry into the gravy using a whisk until it thickens.
-
Allow to gently bubble. Add any meat juices from the rested meat. Check for seasoning and add a little more salt and pepper if needed.
-
If you prefer a darker brown gravy, stir in the gravy browning.
-
Serve immediately. Or turn off the heat until the rest of your roast dinner is ready and reheat just before serving. If you’re short on hob space, pour into a microwaveable jug and reheat in the microwave right before serving.
Notes: Roux Method (Alternative)
- Meat juices from your roasted meat
- 2 tbsp plain (all-purpose) flour
- 2-3 crumbled stock cubes (chicken, beef or lamb, depending on which meat you’ve cooked, or a mixture of chicken and beef for roast pork) or 3 tsp concentrated liquid stock
- 3 cups (720ml) hot vegetable stock – from your boiled/steamed vegetables and potatoes
- 1/4 tsp salt
- 1/4 tsp black pepper
- 1/4 tsp gravy browning (optional)
Instructions for Roux Method:
- Heat the meat juices in the roasting tin (ensure your roasting tin can take direct heat).
- Sprinkle on the flour and mix together with a whisk to form a thick paste. Cook for 1-2 minutes, stirring constantly, to cook out the raw flour taste.
- In a jug, mix together the crumbled stock cubes and hot vegetable stock. Slowly pour this stock into the roux whilst stirring continuously with a whisk to prevent lumps.
- If you have any further meat juices from the rested meat, pour them in now.
- Bring the gravy to a boil, and slowly stir with the whisk until thickened. Season with salt and pepper to taste.
- If you want the gravy to be a darker brown, stir in the gravy browning.
- Serve immediately. Or turn off the heat until the rest of your roast dinner is ready and reheat just before serving. If you’re short on hob space, pour into a microwaveable jug and reheat in the microwave right before serving.
Nutritional information is per serving.
Nutritional Information (Approximate)
Calories: 59kcal
|
Carbohydrates: 4g
|
Fat: 4g
|
Sodium: 887mg
|
Sugar: 1g
Nutrition information is automatically calculated, so should only be used as an approximation.
Some of the links in this post may be affiliate links – which means if you buy the product I get a small commission (at no extra cost to you). If you do buy, then thank you! That’s what helps us to keep Kitchen Sanctuary running. The nutritional information provided is approximate and can vary depending on several factors. For more information please see our Terms & Conditions.